Blog Feed

Posted in Blog

Aug 2020 Book Recs

I read nine books last month, and I want to share with you a couple of my favorites! I had a few really good ones that I just have to share.

Verity by Collen Hoover was excellent. I stayed up way too late one night to finish it. It’s a thriller about a woman writer who agrees to finish writing a book series for another author. The original author is injured, so her husband seeks out a new author to finish the series for his wife. Admittedly, I haven’t read much in this genre. I had a few years in high school where I read everything from Stephen King, but that’s about it. And Stephen King’s work is now just too graphic and too far in the horror realm for me. I definitely picked up some more thrillers after enjoying Verity so much!

Minor Dramas & Other Catastrophes is a debut novel by Kathleen West that just published this year. It’s about two mothers in a high school who are dealing with drama and rumors in a highly privileged school. One mother is a teacher with a “liberal agenda” and the others is a “micro-managing, theater mom” of two high school students. It was a quick read in short chapters from various characters’ perspectives that felt all too real.

And my favorite new series goes to the Bromance Book Club by Lyssa Kay Adams. The first book in the series goes by that same title. It is utter fantasy, hilarious, and totally fantastic. It’s like a Hallmark Christmas movie with less cheese (though some!) and lots more laughs. It delivered exactly what I wanted and did it well. It’s about a bunch of celebrity men in the Nashville area who formed a book club to read romance novels and learn how to communicate and form better relationships with women. (Remember, I said it was fantasy!) I read some sections to my husband who politely didn’t mock my book. Just his facial expressions alone, paired with the far-fetched story line, had me belly laughing harder than I have in years.

Let me know if you’ve read anything particularly good lately. I’m always looking for more recommendations.

Posted in Blog

Friday Fav: Free Magazines

Years ago I stumbled upon the knowledge that you could get access to many popular magazines for free. They arrive at my door every month as a nice surprise and a reminder to unwind and perhaps end the day curled up on the couch with a cool beverage and some freshly printed reading material.

Sites like Mercury Magazine and ValueMags offer free subscriptions to many popular magazines. You either pick a free magazine currently available on their site or sign up with your email address to receive email alerts when free subscriptions become available. Over the years, I’ve gotten subscriptions to Popular Mechanics, Men’s Health, Better Homes and Gardens, Parents, Family Circle, Redbook, Southern Living, Martha Stewart Living, and HGTV magazine. It’s been great!

What’s the catch? Well, you obviously have to give the company some of your personal information to get the subscription, and they try to upsell you on other magazine subscriptions. (“Get X now for only $2!”) It just takes a few clicks of saying no before you can order the free subscription. For me, it’s a price I’m willing to pay to have free reading material delivered to my door.

I highly recommend checking it out if this sounds like something that might interest you.

Happy Friday!

Photo by Charisse Kenion on Unsplash

Posted in Blog

Money Planning Series: #3 Rundown of Our Provided Budget Template Excel File

Happy Wednesday! This is the third post in my money planning series. The first post covered our budget tracking system. The second post discussed how we integrate Mint into this system. Today’s post combines the two to some degree. I’ll start by sharing the budget template I created that models our budget tracking system.

The first thing my husband and I did when we set up this document was determine how much we wanted to have in each virtual envelope (Column B). These were definitely goal amounts in the beginning (like making sure we have a fully-funding emergency fund). It gave us goals though and helped frame our conversations about money and our priorities.

I also needed these goal amounts because I wanted to know when we should stop filling some of these envelopes. If we put a set amount of our income into our health: medical/dental virtual envelope each month, I wanted to know when it’s full and can stop putting money in there.

Next, we had to set up a plan to get to these goals without surpassing our income. We accomplished this by documenting how much we wanted to spend or save each month within each virtual envelope (Column F). This was best guess, wish list level planning at this point. (For instance, if we want to go on vacation next year to Disney World, it’s going to cost about X. There are eight months left so X/8 is how much we need to save per month.)

Next, we wanted to compare our spending and savings plan with our monthly income. Luckily for us, my husband and I are both salaried, so we have set and regular paychecks, which is our only income. However, since we are paid every two weeks, most months we receive two paychecks each and some months we earn three. I wanted to look at our budget with and without those “extra” monthly paychecks. Once we entered our take home pay per paycheck into the budget (Column H), our planned monthly payments were subtracted from our monthly incomes and we saw how much was left over or overspent.

Armed with this information, we revisited our monthly payments (Column F) and made adjustments. We decided which expenses to eliminate or reduce or discussed how we could raise our income. When we’re saving for something in particular, like a new home project we’re planning, then we may decide to cut back or temporarily stop funding some virtual envelopes (like vacations or our fun money).

Personally, I like to plan to live off 24 paychecks from each of us per year so the two extra are surprise money we can drop into any virtual envelope we want, often more dinners out, paying down debt, or gifts/charity. So, at this point in the budgeting process, I’m making sure every dollar of our monthly income is allocated to one of our virtual envelopes (Cell H17).

The first time we used the Excel budget tracking document, we had to determine how much money to put in each virtual envelope to start. We could only put money in these virtual envelopes if we had actual cash or money in the bank for them. To figure this out, we documented how money we had (Cells B42-B51) and how much money we owed (Cells C42-C50). Whatever was leftover was free to put into any virtual envelope we pleased (summed in Cell C51). Some envelopes were easy to determine. We knew our cell phone bill would be X, so we better have X in that envelope for the month. Others were more variable, like groceries or restaurant spending. (Over time we’ve used Mint’s trends feature to see how much we spend in these categories to set better targets.)

Once our virtual envelopes were filled, we double checked to ensure everything balanced out. Every month, the money we have (Cells B42-B51) has to equal the money we owe others (Cells C42-C50) plus what we owe ourselves/what’s in our virtual envelopes (Cell C51). Mint tracks how much money is in each account, so I can easily grab numbers for the spreadsheet here. If the money we have doesn’t equal what we owe others and ourselves, then the amount in each virtual envelope has to be adjusted.

So, at this point, we have goals (Column B), a plan for monthly payments (Column F), and a way to track that the amount we have doesn’t exceed the amount we other others and ourselves (Row 53). Now we’re in execution and maintenance mode. Each month we track what’s coming in and out of each virtual envelope and how we’re tracking against our goals.

Some months will have no expenses but have a monthly payment plan. In those cases, you can decide what to do with this “found” money. For instance, some months our pet expenses are $0. We are well stocked on her food and meds and there are no vet appointments. However, every month we plan to spend $67 on her care. In this case, we keep that $67 in her virtual envelope until we get to the envelope cap. This covers us when her $350 vet bills come around. Once we meet the envelope cap, the extra money goes wherever we want (typically other virtual envelopes that overran or savings categories).

And, the best part is, when I know there’s money in the budget for it, I won’t hesitate to spend it according to our plan. I can enjoy an extra night of takeout when I don’t want to cook or splurging on a gift for someone. And I feel mighty proud of us when we meet a savings goal or pay off a major debt, even if no one else ever hears about it. As Hannibal often said on The A-Team TV show and is captured in my budget template, “I love it when a plan comes together.”

Photo by Sharon McCutcheon on Unsplash

Posted in Blog

Considerations When Preparing Elementary Students for Virtual Learning

Virtual school is about to start for us after Labor Day, so I’ve been spending a fair amount of time thinking about how we’re going to make our 100% virtual school work for a kindergartener and second grader and two parents attempting to simultaneously work from home. Here’s my plan. (Let’s revisit this post in six weeks and laugh at how naive I may be here.)

Give Each Student Their Own Space to Limit Distractions

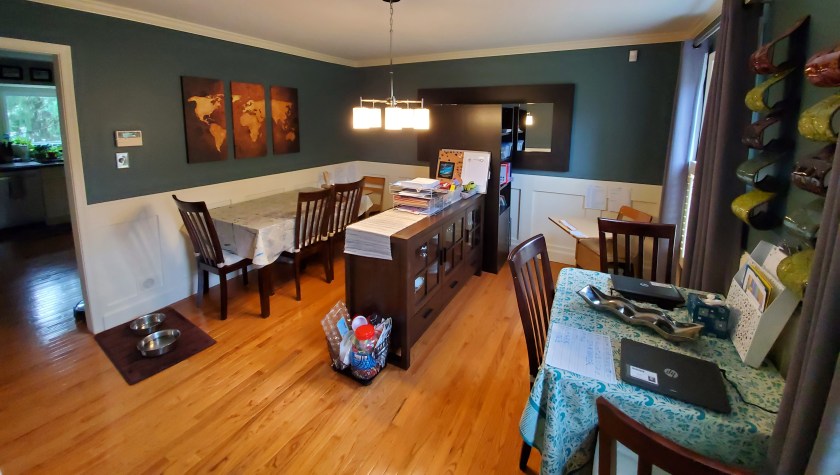
We are lucky to have a formal dining room available (that we’re obviously not using right now) that we can spare for the kids learning space. I’ve rearranged the furniture in there multiple times since COVID started to adjust to our needs, and we recently did so again to prepare for full-time virtual school. Since both kids will be on video conferences most of the school day (!!!), they needed to have separated spaces.

I arranged it so each kid essentially has their own “cubicle” with an old school student desk (thank you in-laws for the great gift provided pre-2020). They have been able to customize them how they like by picking where exactly to place their desks, setting up their laptops, picking out supplies, etc.

To help them (and my husband and I) stay focused, we’ve posted their schedules and other info they need to have handy next to their desks. I also wrote a note of encouragement for each boy that is posted as well.

Allow for Adjustments Based on Activity

Our kids are going to be taking all types of classes in this space, including reading, writing, physical education, and music. I attempted to consider this when creating the space by:

  • Providing a table nearby for the kids to rest the laptop on if they have to write or use other materials at their desks. Their desk space isn’t particularly big, so this is our workaround.
  • Leaving at least some empty space around the desk to allow for jumping around. I’m expecting there to be some movement breaks throughout the day, so they need space to move around.
  • Placing age appropriate books within arm’s reach of the desk. I’m sure the kids are going to be directed to digital libraries, which mine will likely favor, but I want them to have the option to pick up a paper book if they want it.
  • Having an art space in the room for them to do messy projects. I’m really hoping the school doesn’t go in this direction, but we’re prepared with an ever-covered table in the room just in case.

Foster Independence

My husband and I are going to try and get as much work done as possible during actual business hours this Fall, so we need the kids to be independent. We are not going to sit next to them throughout the day. I would go insane, and I don’t think the kids will need it. We’ll be on call if they need us though. My husband and I am fostering their independence in a few ways.

First, just like in the regular classroom, the boys each have their own pencil box that they stocked with pencils, crayons, glue sticks, scissors, and other commonly used items. They keep these in the storage space under their desks. I want them empowered to find and use the supplies they need to get their work done.

Second, we have them practice using their technology, particularly Mr. 4 year old because it’s all new to him. He has been practicing logging into his computer, using the mouse, and finding his virtual classroom. I should have him practice using headphones too.

Third, we will have established routines. Only certain scheduled breaks will be designated as snack time. I will give the kids ideas of things to do during longer unscheduled breaks by setting out puzzles, Play Doh, or LEGOs. Alexa is set up to provide reminders five minutes before each scheduled break ends. I’m going to be flexible here and adapt our routines as needed as the year unfolds.

Lastly, I incorporated common words seen in directions into our “mommy school” activities over the summer (e.g., words like write, circle, add, subtract, answer, complete, etc.). We did this because I wanted Mr. 7 year old to be independent enough to read the directions for his assignments without always asking his teacher or us what he needs to do.

Set Expectations

We’ve started talking with the boys now about what this school year is going to look like and how different is going to be. We’ve begun conversations about the need to listen to the teacher, have fun, and get your work done while you’re in school. There have been conversations about how mommy and daddy will be working while they’re at school and what that means for them.

The boys are still sharing a space, and we’ve made it clear that school happens in the dining room. I think we’re going to be stricter this Fall about school happening in that space to help compartmentalize when to work and when to play. This may be one of those things that I laugh about in six weeks because I’m not sure if it will work or end up being helpful.

Plan to Adapt

I know I’ll go into the school year with a much better mindset if I anticipate that the plan will change. We will all learn a lot as a family regarding what works for our professional, family, and school lives, and we’ll make tweaks and be better for it. This growth mindset will be the key to our survival.

As my bestie always reminds me after I call her fretting about something school related, we do hard things. We got this. And you know what, so do our kids because we will lead the way.

Posted in Blog

Friday Fav: Self-Care Products

Given the sameness of every day, I have found that “spoiling” myself with some self-care products has been a nice stress relief. Here are some of my favorite products for an at-home spa day.

  • Sally Hansen’s Diamond Strength nail polish, particularly the Brilliant Blush color. It’s under $4 at Walmart! I love how long this brand lasts and its light shade with a shimmer. I’ve even attempted my own french manicure with this color as the base. I need some practice, but it’s certainly cheaper than a spa manicure.
  • Baby Foot Exfoliation Foot Peel is awesome! Stay with me here. It is kind of gross, but it’s so worth it. This is the best brand I’ve tried. You wrap your feet in these booties with “6 types of natural extracts” for one hour, wash it off, and wait for your feet to peel over the next several days. (You’ll want to wear socks.) Afterward, your feet are extra soft and worth the gross peeling feet stage.
  • Jergens Wet Skin Moisturizer keeps my skin moisturized without feeling sticky like you can sometimes with lotion. It is quick and easy with a sweet subtle scent.
  • Neutrogena Hydro Boost Hyaluronic Acid Hydrating Water Gel is a great facial moisturizer that is light and feels hydrating. A little bit goes a long way, which makes the small bottle last a while.
  • The Bow Ties and Bourbon scent from Bath and Body Works is one I love that my husband even tolerates well. It’s a seasonal scent, which means when I see it, I need to grab it immediately. I particularly like the “wallflowers” room air freshers and leave them in my bathroom so every time I walk in I get to smell the scent.

Husband, if you are reading this, bookmark this page for Christmas! *wink*

Happy Friday!

Photo by Camille Brodard ~ Kmile Feminine Creative Designer on Unsplash

Posted in Blog

Money Planning Series: #2 How Mint Helps Us Budget

Disclaimer: I’m not sponsored or compensated in any way by Mint.com. These opinions are all my own.

Mint.com is one of the popular tools out there to help people manage their budgets and plan their finances. We’ve been using it for 10+ years and have incorporated into our Excel-based budgeting system. And, the best part is, it is free!

Essentially, Mint is a way to connect all of your financial accounts in one location so you can get a comprehensive look at your financial status at a glance. Mint has a variety of features built into the site that help with tracking bills, setting financial goals, managing investments, analyzing savings and spending trends, and checking your credit score.

We have used many of these features, but I’ll focus today on how we use Mint to manage our budget. The first thing to do is to log in and link views of each of your financials accounts to Mint. By linking views of each of your accounts (e.g., savings, checking, investments, debts, etc.) and listing your assets (like real estate or vehicles), you can see your net worth.

NOTE: You are not able to manage any accounts through Mint, only view them. So you can’t transfer money from your savings account to your checking account, but you can see transactions in and out of each account.

To align Mint with our Excel-based budgeting system, I then created a “budget” for each virtual envelope we use and set a monthly amount to be spent within each. Then, as each transaction posts to one of our financial accounts, it shows up in the global list of transactions. I can sort through the transitions and assign each of them to one of the “budgets.” The best part is, I can establish rules that automize a lot of this by auto-assigning purchases from certain vendors to particular categories (e.g., Wegmans purchases are always classified as groceries). It’s to the point now that I can quickly scroll through the list of monthly transactions and just double check that it’s right in a matter of minutes.

As an aside, I used to sort through receipts from big-box stores and split transactions among multiple categories (e.g., part of a Costco transaction would fall under groceries and the remaining portion household goods). I’ve moved away from this because it was too time consuming and our spending wasn’t variable enough that we were changing our spending. I now put all of the Amazon, Target, Costco, etc. purchases into one generic shopping category.

Now, you may be asking, isn’t the act of having what Mint calls “budgets” with set spending and savings amounts that you track over time essentially a budget? Well, yes. You could exclusively use Mint for your budgeting purposes and be completely set. My Excel-based budgeting system came first though, so I’ve incorporated Mint into my system. I like my system better for tracking savings though.

I use Mint as a shortcut and grab totals. For instance, I take the total monthly amount spent listed in Mint for each virtual envelope (what Mint calls “budget”) and put that number into my Excel-based budget file. Back in the day, I would enter each receipt total manually in Excel, which would take a significant amount of time. Using Mint has saved me at least an hour a month.

I think I’ll leave it there for now. I highly recommend checking out Mint to see if it will benefit you and meet your money management needs. If you have specific questions, let me know!

Photo by Abby Boggier on Unsplash

Posted in Blog

Weekly Task List and Daily Planner Printables

I’m certainly the type of person who benefits mentally from creating structure in uncertain times. I find the act of organizing my spaces, schedule, money, what-have-you makes me feel like I have more control of a situation than I actually do. It sets me up to adopt good habits and routines.

I’m the type of person who needs to create a list or I can’t stop thinking about whatever it is that’s on my mind. If I start my work day just responding to whatever is in front of me…emails, IMs, Slack chats, etc., then I get to lunch not having anything to show for my time and feeling panicked that I’m behind, without really knowing what I’m behind on exactly. Cue instant stress.

I’m also the type of person who absolutely LOVES crossing things off my to do list. I get great joy in adding that checkmark or crossing something off the list with a swipe of a pen. That’s why I’ve found that having a paper and pen to do list and tracker is immensely helpful for me.

Today I’ll share the weekly task list and daily planner pages that I’ve started using. I first searched online for planner books and printable pages that others offered, and I didn’t find anything that I loved. After trying a few free printable pages, I decided to create my own. I share them here today in case they are helpful for you as well. They are Word files so you can customize them to your needs.

Weekly Task List

The weekly task list in light gray to allow the ink of my colorful pens to shine through.

This weekly task list purposefully has me focuses on no more than three major tasks or activities per week. I keep it short so I stay focused, and I make sure it covers the items that MUST get done this week without fail.

Then I list all of my projects and the activities associated with each. For me, I need to track my to dos, people I need to follow-up with because they don’t reliably get back to me (grr!!), and meetings I need to prepare for (whether that’s research I need to do, agendas to prep, or folks I need to connect with in advance). Luckily, I only have three major work projects right now, and then I use the fourth section to tracker personal / household activities.

Typically, I take less than 30 minutes every Friday afternoon to create my weekly list, which I do while reviewing last week’s list, looking ahead to the next week’s electronic calendar, and reviewing project schedules.

Daily Planner Page

The daily planner page helps me keep my days focused.

I’ve been using some version of a weekly tracker for a while, and then I’d start each morning listing on a sticky note the 3-5 things I want to accomplish for the day. That worked just fine, but I wanted to try something a bit more structured.

In this daily planner page, I list the three must dos I have to accomplish for the day. These are more focused than the three major focuses listed on the weekly task list. The weekly task list may include the need to submit X deliverable; whereas, the daily task list may say to review section 1 of X deliverable.

I then list any major activities coming up for the day in the calendar section. I’m NOT spending time repeating what’s in my electronic calendar really. I’m just painting the landscape for the day and making sure I’m aware of what’s coming up. You could also list meals you’re planning in this section, but that’s not something I’m tracking.

Then, there’s a section to include any nice-to-have to dos that I’ll get to if I have time available. Under this list is a spot to note any exercise accomplished for the day and my water intake. The notes section at the bottom is to capture any quick items I may need to record based on meetings I’m in, like future to do items or phone numbers.

If you use different printables or have another approach, let me know! I love hearing about how others manage their time and tasks.

Photo by Stefan Cosma on Unsplash

Posted in Blog

Friday Fav: Weighted Blankets

I am a huge fan of weighted blankets. So much so, that the 15 lb. one I use comes with me on road trips so I don’t have to sleep without it. They are often noted as a tool to help people relieve their anxiety, which I could see being helpful. I didn’t purchase one specifically for that reason. I had just heard they are relaxing and wanted to see for myself.

Given my addiction to it now, I’d say it works as described! It’s not like you put it over you and immediately feel calm. It is more that it feels like a hug….or perhaps like the weighted cover that the dentist puts over you before an x-ray. The first time I used it, I declared it did nothing for me and then feel asleep on the couch 15 minutes later.

Now I have my own 15 lb. weighted blanket, and I purchased two other 5 lb. weighted blankets for the kids. It works really well for one of them, but less so for the other kiddo. However, if either one of them starts to stir a lot when they have snuck into bed with my husband and me, throwing a weighted blanket on them keeps them still. That alone makes it worth the purchase to me!

Posted in Blog

Money Planning Series: #1 Our Budget Tracking System

I’ve given some thought and space here to time tracking, but money is another limited resource that gets a significant amount of my intentional planning efforts. I want to give this topic the attention it deserves, so every Wednesday for the next several weeks, I’ll cover a different aspect of financial planning and budgeting.

Now, I’m not a certified financial planner. This isn’t a place for me to discuss or offer advance on what you should do with your money. That’s not the point of the series and certainly not my expertise.

In this space, I will share the systems and planning we use to manage our financial resources, in case it is helpful to others. It is a bit of a look under the hood. (And I know I would naturally just be curious how another family makes it happen!)

To start the series, let me share how we set up our budget. Our budget is organized in an Excel file that is managed essentially like a set of virtual envelopes. All of our envelopes (a.k.a., budget categories) are listed along Column A. There are about 40 envelopes capturing all of the regular expenses we’re paying (from homeowners association dues to utility bills) and things we’re saving for (including Christmas presents and retirement). Anything we can think of that costs a “significant” amount of money that we can anticipate and reoccurs gets its own envelope. There’s an emergency savings envelope for those expenses you can’t just plan on.

Then, each month gets its own column (Column B through infinity). For each month, we denote how much money is in each envelope. Every new month starts out with amount the previous month ended with, and we subtract any expenses and add any additional money we put in the envelope. For example, we know our mortgage payment is X. We make sure to end each month with X in the envelope.

Some budget categories are more variable, like automobile gas. We start out with what is in the envelope from the previous month, subtract out receipts for gas purchased, and add a set amount each month. Basically, since I’ve tracked our expenses for years, I know our average amount spent per month on gas, so I always put at least that much in the envelope every month. Some months we have extra in the envelope, which just carries forward to the next month in case we need it (like months with long road trips or heavy commuting).

Many of our budget categories are for various items we’re saving for. Now, we could always have one pot of money called savings and then spend it on whatever we wanted if and when we have enough money saved. That’s a fine strategy, but I like saving for something specific. It allows us to better set savings goals and see how long it will take us to save for it.

For our savings budget categories, there’s typically not much money coming out of the envelope. We just keep adding a designated amount month after month. This is how we pay for our vehicles. We act like we have a car payment and pay ourselves every month. We don’t buy a new car until we have enough saved to buy it with cash.

The key to the entire budget is all of the money in the envelopes has to equal the total money we have available. To check this, I compare the sum of all of the money in our virtual envelopes to all of the money available in our financial accounts. Luckily, in Excel, I set up simple formulas to do this comparison for me.

So that’s the basics. I’ll cover additional topics later in the series, like how we leverage Mint and how we use this budgeting system when an emergency occurs.

Photo by Fabian Blank on Unsplash

Posted in Blog

Staying Prepared with a Medical Information Printable

As a planner, I like to be prepared for possible emergencies. I’m that person who packs medicines for kids when we take trips and has an emergency kit stashed in the house in case we need it.

One of the ways I prepare is by having a one-page print out of my medical information in my wallet in case I need it. I can’t tell you how handy it’s been to have at doctor visits to either help fill out paperwork or to give to the doctor for reference. My husband knows it is there as well, so he has all of my information available if I’m incapacitated.

I made some updates to the file this weekend. Now I’m inspired to make one up for both of the kids too!

In an effort to help others avoid reinventing the wheel, feel free to download an editable Word template of the medical information printable below.

Template of my medical information printable

The printable includes the following sections:

  • Personal Information: List what you want medical professionals to see right away and they most frequently ask for: blood type, allergies, contact information, etc.
  • Medication and Purpose: List the medication taken regularly, what it’s used for, and how often/what dosage you take.
  • Personal Medical History: Here I include dates and my age when I had various medical procedures, but I could see others listing different relevant information here about illnesses or diseases.
  • Vaccinations and Tests: Here are the dates and results of various tests run and vaccinations received. In the printable template provided, I left in the vaccinations and tests in my file, but there is space to add others.

Of course, the glory of having a Word document printable is that you can edit the form as you see fit. This is a starting point to think about what information you think is important to caption for you, your loved ones, and your doctors. If you adopt this tool, I encourage you to customize it to fit your needs.